Installing on Windows
After downloading, right-click the .zip file and select "Extract All..." before running the installer. Running the installer directly from inside the zip archive will cause errors.
📹 Watch the 30-second install walkthrough
Download and Unzip
Download CiteLogos-Windows.zip from our website. Right-click the .zip file and select "Extract All..." to unzip it to a folder on your computer. Then open the extracted folder.
Close Microsoft Word
Make sure Microsoft Word is completely closed before running the installer. The installer will prompt you if Word is still running.
Run the Installer
Double-click CiteLogos-Installer.vbs to run the installer. It will copy CiteLogos to your Word startup folder automatically.
Open Word
Open Microsoft Word. You should see a new "CiteLogos" tab in the ribbon, next to View and Help.
Installing on Mac
After downloading, double-click the .zip file to extract it. Open the unzipped folder before running the installer.
📹 Watch the 30-second install walkthrough
Download and Unzip
Download CiteLogos-Mac.zip from our website. Double-click the .zip file to unzip it, then open the extracted folder. Do not try to run the installer from inside the zip archive.
Run the Installer
Double-click the installer file to install CiteLogos. This will copy CiteLogos to your Word startup folder.
Open Word and Enable Macros
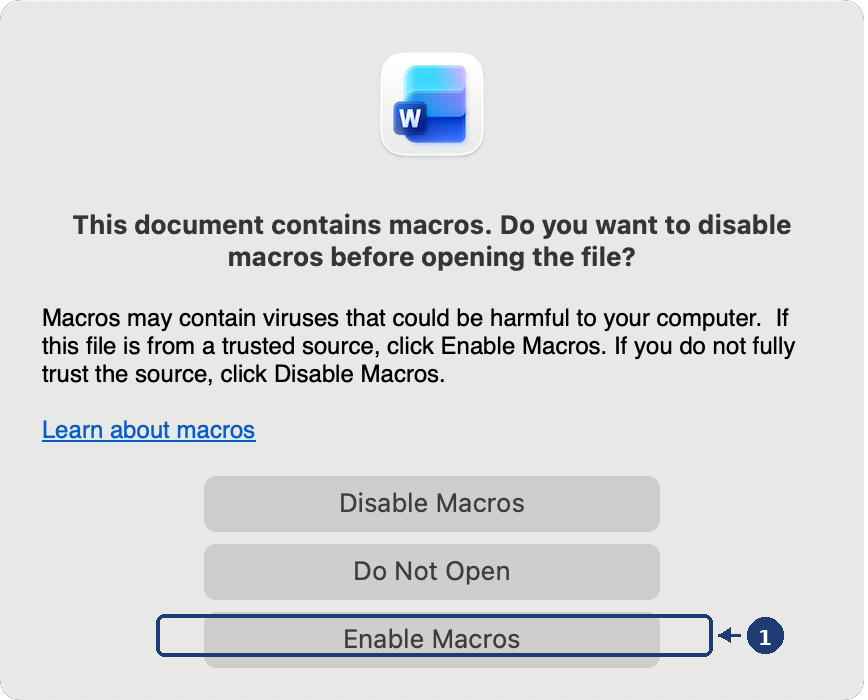
Open Microsoft Word. When prompted, click Enable Macros to allow CiteLogos to run.
Start Using CiteLogos
The CiteLogos tab should now appear in your ribbon. You're ready to check your citations!

One-Time Setup: Let Word Label CiteLogos Fixes Correctly
CiteLogos Pro applies its fixes as tracked changes labeled "CiteLogos" so you can review them separately from your own edits — and accept or reject them all at once. On a Mac signed in to a Microsoft 365 account, Word ignores this label unless one setting is turned on. It takes about ten seconds:
In the menu bar, choose Word → Preferences…, click User Information, and check "Always use this name regardless of how I'm signed in to Office." Close Preferences — no restart needed.
Troubleshooting: CiteLogos Tab Not Appearing
If the CiteLogos tab doesn't appear after installation, you may need to manually enable it:
Open Templates and Add-ins
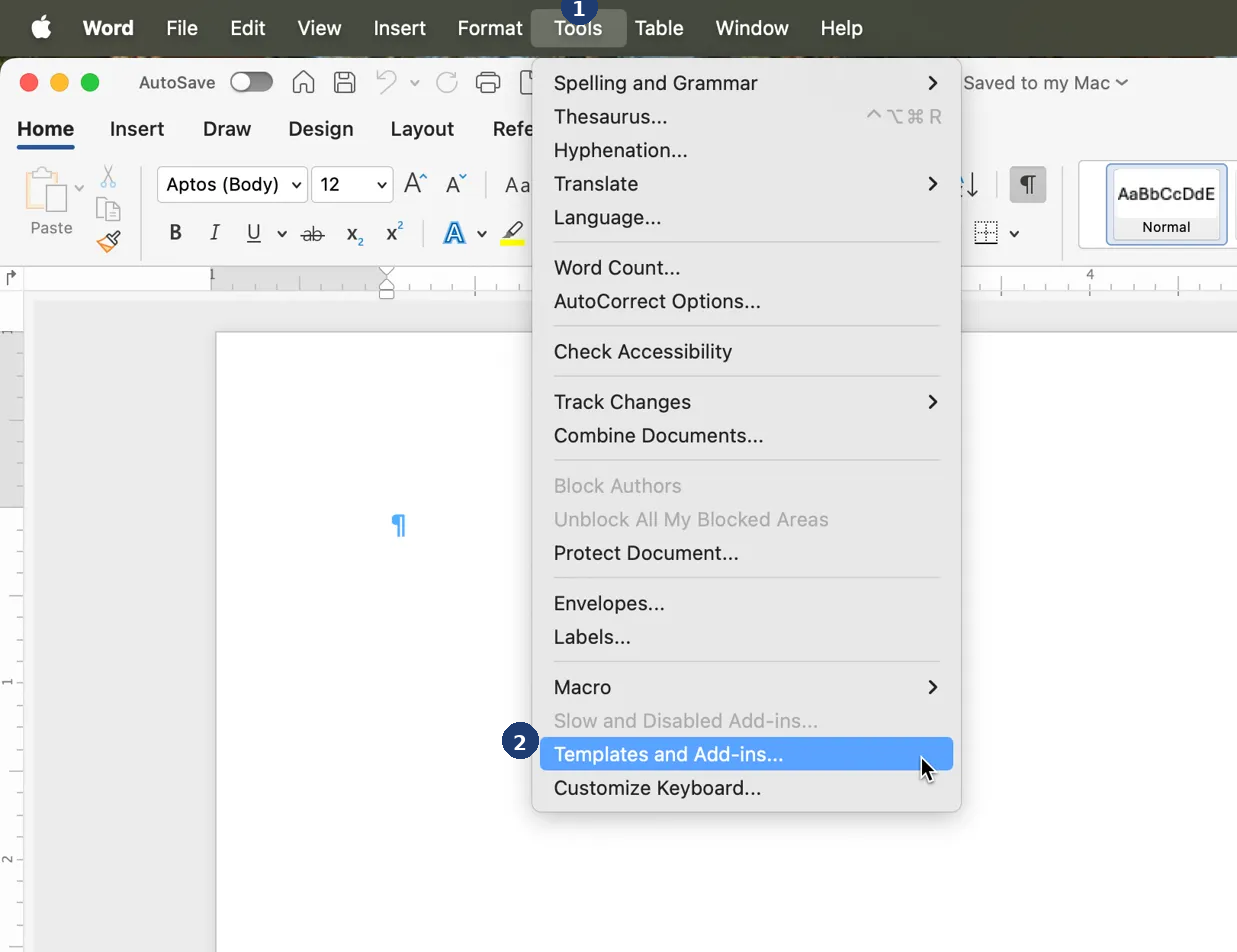
In the menu bar, click Tools, then select Templates and Add-ins...
Enable CiteLogos
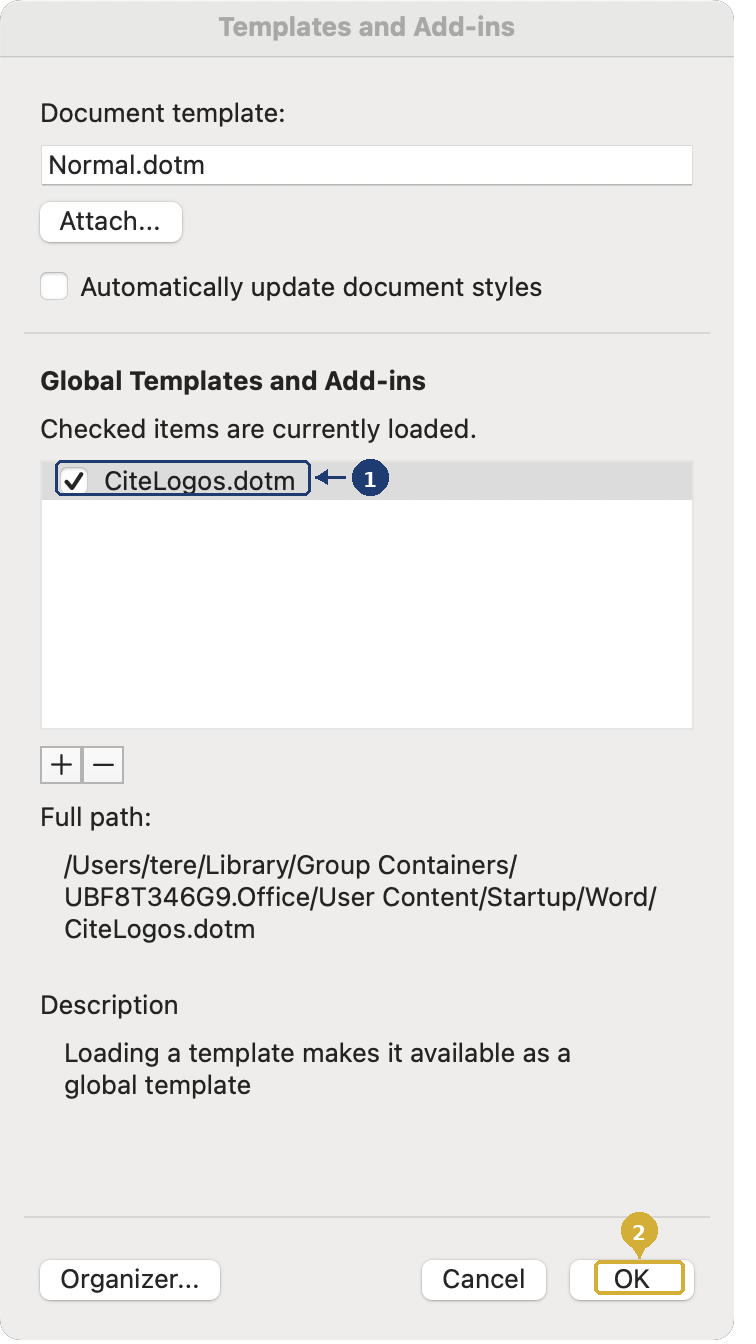
In the Templates and Add-ins dialog, check the box next to CiteLogos.dotm under "Global Templates and Add-ins", then click OK.
Enable Macros if Prompted
You may be prompted to enable macros again. Click Enable Macros to activate CiteLogos. The CiteLogos tab should now appear in your ribbon.
Using CiteLogos
These steps describe a citation check, available on every plan. Pro subscribers can also run auto-fix—see Using CiteLogos Pro below.
Open Your Document
Open the Word document you want to check in Microsoft Word.
Click "Check Citations"
Go to the CiteLogos tab in the ribbon and click the "Check Citations" button (or click the lambda icon). CiteLogos will scan your entire document.
Review the Comments
CiteLogos places comments throughout your document wherever it finds potential errors. Each comment explains the issue and provides a recommended fix, if available.
Make Corrections
Review each comment, make the suggested corrections to your text, and delete the comment when done.
Clear Comments (Optional)
When finished, click "Clear Comments" in the CiteLogos tab to remove all CiteLogos comments at once. This only removes comments created by CiteLogos—your other comments remain.
Using CiteLogos Pro
Click "Run Pro"
Go to the CiteLogos tab in the ribbon and click "Run Pro." CiteLogos checks your entire document and corrects the errors it can fix with confidence—in your text (comma placement, et al. usage, ampersands, citation order) and in your reference list (alphabetical order, italics, title case, hanging indents, spacing, DOI formatting, and references split across multiple lines).
Review the Tracked Changes
Every fix is applied as a tracked change labeled "CiteLogos," so you can see exactly what changed and why. Issues that require your judgment—such as a citation with no matching reference—are left as comments with recommendations instead.
Read the Summary
A summary dialog shows what was fixed and how many items need manual review. If the Summary Comment toggle is on, the same summary is also added as a comment at the top of your document.
Accept the Fixes
Accept or reject each change individually from Word's Review tab, or click "Accept Fixes" in the CiteLogos tab to accept every CiteLogos correction at once. Your own tracked changes—and your coauthors'—are never touched.
Pro Settings
The Pro Settings group in the CiteLogos ribbon controls what a Pro run does and how its changes are recorded. Your choices persist between sessions.
Fix In-Text Citations (default: on)
When on, citation errors in your text are corrected as tracked changes. When off, CiteLogos flags the same errors as comments with recommendations instead—nothing in your text is changed. Instructors and writing centers use this mode so students see what needs fixing and make the corrections themselves.
Fix References (default: on)
When on, reference list errors are corrected as tracked changes. When off, your reference list is still checked, but issues are flagged as comments only.
Unused Items Appendix (default: off)
When on, a Pro run appends a list of in-text citations without matching references and references never cited in your text, so nothing slips through before you submit.
Track Changes (default: on)
When on, fixes are applied as tracked changes so you can review each one. When off, fixes are applied directly to your text.
Fix Comments (default: on)
When on, each auto-fix gets a comment showing what was changed. When off, fixes are applied without individual comments.
Summary Dialog (default: on)
When on, the completion dialog lists every fix applied. When off, a compact confirmation shows just the totals.
Summary Comment (default: on)
When on, a summary comment at the top of your document lists every fix applied and how many items need manual review.
Understanding Error Types
CiteLogos checks for several categories of APA 7th edition errors:
In-Text Citation Errors
Problems with citations in the body of your document, such as (Smith, 2023) or Smith (2023).
Reference List Errors
Problems with entries in your References section.
Cross-Reference Errors
Mismatches between your in-text citations and reference list.
Common Errors Explained
Missing Period After "et al."
"Et al." is an abbreviation of "et alia" (and others). It always needs a period after "al".
Correct: (Smith et al., 2023)
Missing Comma Before Year
In parenthetical citations, a comma separates the author(s) from the year.
Correct: (Smith, 2023)
Ampersand vs. "And"
Use "&" inside parentheses, but "and" in narrative citations.
Correct: (Smith & Jones, 2023) / Smith and Jones (2023)
Multiple Citations Order
When citing multiple sources in one parenthesis, list them alphabetically by first author.
Correct: (Adams, 2022; Zhang, 2023)
Citation Not in Reference List
Every in-text citation must have a corresponding entry in your References.
Login Troubleshooting
Some university and corporate email systems use security filters (such as Microsoft Safe Links) that can block or interfere with login links. If clicking the login button in your email gives you an error or a blank page, follow the steps below.
Video Guide
Step-by-Step Instructions
Request Your Login Link
Go to citelogos.com/account and enter your email address, then click Send Login Link.
Right-Click the Login Button
When you receive the email, do not left-click the "Log In to CiteLogos" button. Instead, right-click the button and select Copy Link (or "Copy Link Address" depending on your browser).
Paste in a New Browser Tab
Open a new tab in your web browser (Chrome, Firefox, Safari, or Edge), click in the address bar, and paste the link (Ctrl+V on Windows, Cmd+V on Mac). Press Enter to go to the page.
You're Logged In!
You should see a green "Welcome back" banner confirming you're logged in to your CiteLogos account.
Account & Billing
Your subscription is managed from your account page at citelogos.com/account. You can cancel, restart, or update your payment method there at any time—no need to contact us.
How to Cancel Your Subscription
Sign In to Your Account
Go to citelogos.com/account, enter the email address you registered with, and click Send Login Link. Open the link from the email to sign in. (Not sure which email you used? See the FAQ below. Login link not working? See Login Issues.)
Find the Cancel Subscription Card
On your account page, scroll to the Cancel Subscription card (just below Change Plan) and click Cancel subscription.
Confirm
A confirmation window shows the date your access ends. You can optionally tell us why you are leaving, then click Cancel subscription to confirm (or Keep subscription to change your mind). Your plan stays active through the end of the period you have already paid for and will not renew; your account page will show Canceling with the end date.
Refunds
Subscription fees are non-refundable, including for unused time within a billing period (see our Terms of Service, Section 3.4). When you cancel, you keep full access through the end of the current period. If you are not sure CiteLogos is right for you, the 7-day free trial is the time to find out—cancel during the trial and you are never charged.
Frequently Asked Questions
Still Need Help?
We're here to help you succeed. Reach out with any questions.
support@citelogos.com